Writing into Snowflake using Tableau prep

With the 2020.3 release of Tableau, it is possible to write to external databases like SQL Server, PostgreSQL, Snowflake and others, via Tableau Prep. We can now use all the transformations possible in Tableau Prep (aggregations, pivots etc.) and load the transformed data directly into our target database, and thus streamline our ETL process. Moreover, it is also possible to schedule this data loading via the task scheduler or on Tableau Server or Tableau Online and automate the ETL process one step further.
In this article, we will go through an example using Tableau Prep and Snowflake. Much more than a database, Snowflake is an integrated data platform, conceived from the ground up for the cloud. Its patented multi-cluster, shared-data architecture features compute, storage and cloud services layers that scale independently, enabling any user to work with any data, with no limits on scale, performance or flexibility.
Throughout this article, we will use the Superstore sample flow available in Tableau Prep to load the data into Snowflake. If you would like a more hands-on experience, you can download a free trial of Tableau Prep here. You can also set up your own Snowflake account by visiting Snowflake here to sign up for a free trial.
Prerequisites
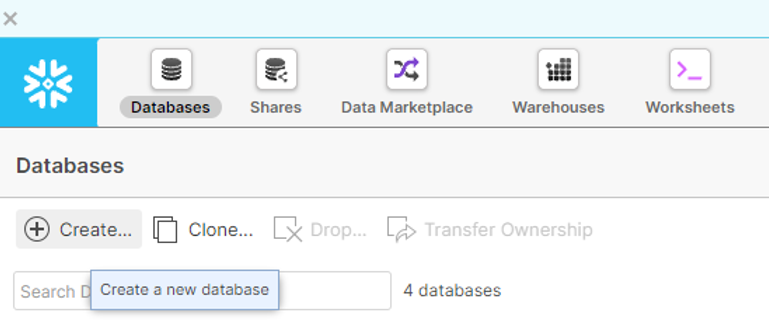
We will first make sure there is a database in our Snowflake account. The screenshot below shows how to create a new Database by clicking on “Databases” on the top left of the screen, and then on “Create”. We will our database “TEST”.
Our new database will be displayed in the list of available databases. We will then click on the database name order to create a new table in this database.
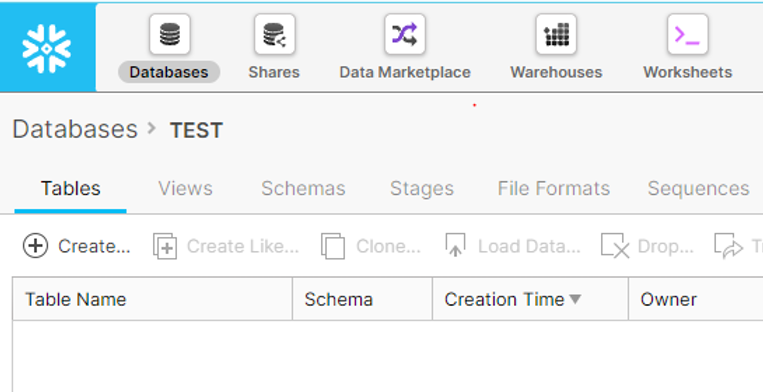
We will name the table “TEST_TABLE” and select the PUBLIC schema that is automatically created with the new database. We have to add at least one column to create the table.

Writing into Snowflake using Tableau Prep
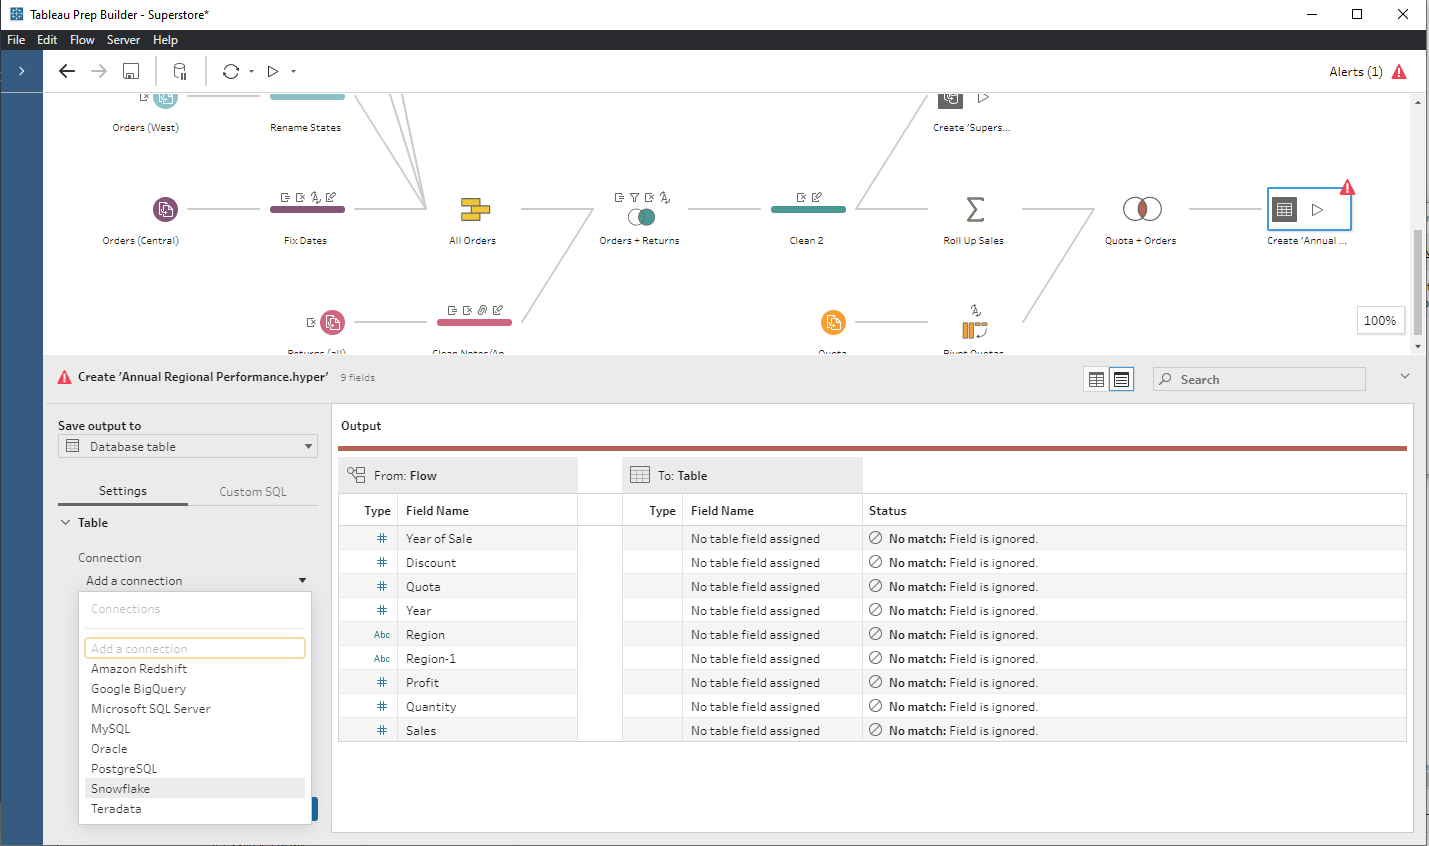
We will now open the Superstore sample flow in Tableau Prep and click on the output step of the flow. In the "Save output to" menu, select "Database table" then select Snowflake as the connection.
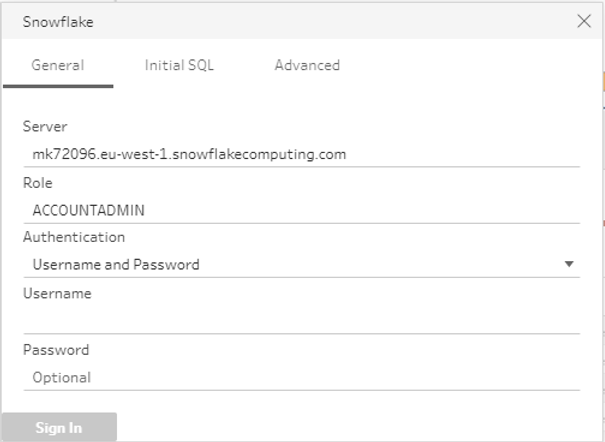
Enter the URL of your Snowflake server. In the “Role” field, make sure to enter "ACCOUNTADMIN" as this is the top-level role in the Snowflake system and will ensure you have access to all the objects you have in your Snowflake account. Then enter the username and password of your account.
After connecting to your Snowflake account, select a warehouse that will provide the compute power to execute queries, then select the “TEST” database we created in the above step, and the “PUBLIC” schema. We now have the choice to select an existing table or to create a new one by writing a new table name. In our case, we will select the “TEST_TABLE” that we have created earlier.
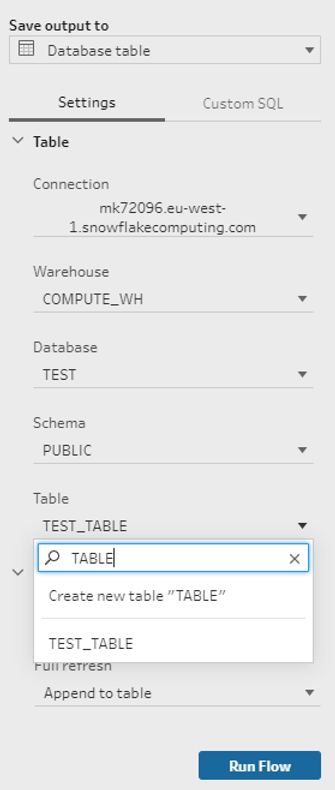
Remember that we create the TEST_TABLE but we did not make sure it had all the necessary columns to receive data from our Tableau Prep flow! The magic happens in Snowflake, because it does not require for your data to have the same number of columns as your target table. In order to have that flexibility, we will choose "Create table" in the "Write options" menu because this option is the equivalent of the SQL query "CREATE OR REPLACE TABLE". The options “Append” or “Replace” will only work if the columns in the target table are the same as those in the data that is being loaded.

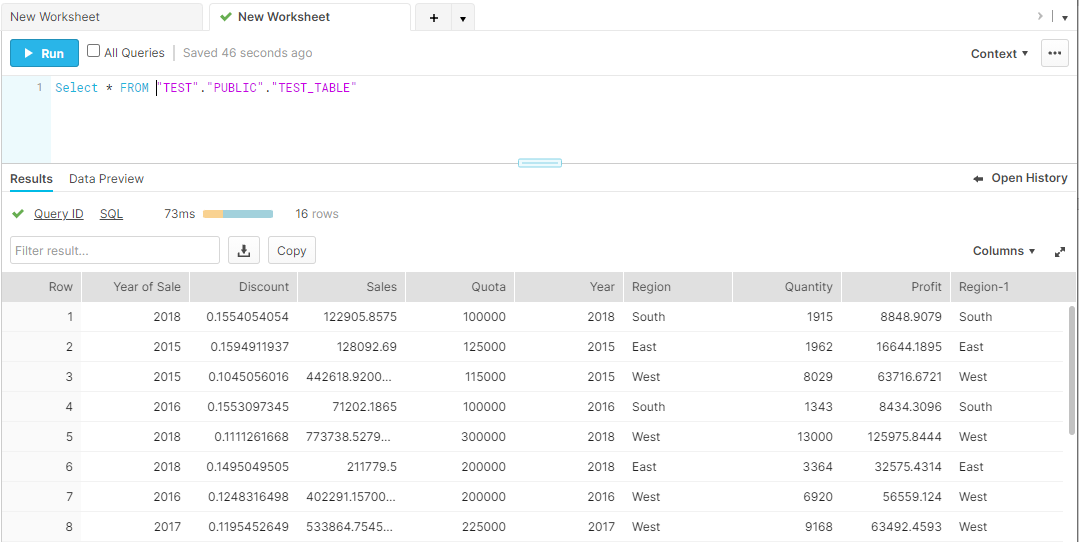
We will then click on Run Flow and the data will be loaded into Snowflake. We will run a simple query to examine our data that had been freshly loaded into Snowflake.
ETL Automation
We can now go one step further and automate this process. For this, we will build a script that runs the flows without us having to open Tableau Prep. If you are using Windows, you can automate this using the Task Scheduler. For this, we need to create two files using a simple text editor. These files are:
1. A JSON file named “creds” that will contain credentials to connect to the Snowflake account. It's content is shown below
{
	"databaseConnections":[
		{
		"hostname":"mk72096.eu-west-1.snowflakecomputing.com",
		"username":"username",
		"password":"password"
		}
	]
}
2. The script batch file that we will call "run". This file contains the installation directory of Tableau Prep, and the locations of the credential file and the Tableau Prep flow file:
cd
\cd "C:\Program Files\Tableau\Tableau Prep Builder 2021.3\scripts"
tableau-prep-cli.bat -c C:\Users\xxxx\Desktop\creds.json
-t C:\Users\xxxx\Desktop\Superstore.tflx
Please note that the credential file implies that your Snowflake password is written in plain text.
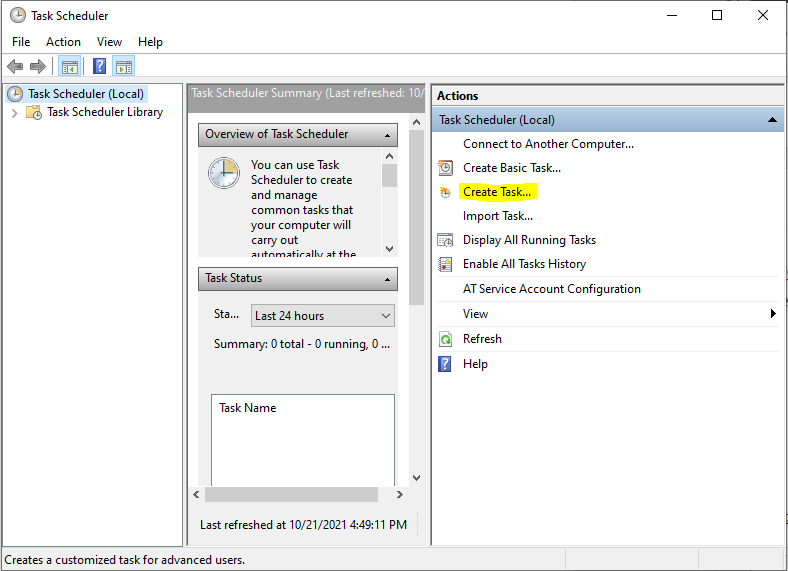
We will now open the Task Scheduler, click on Create Task and give a name to the task in the General tab.
In the Triggers tab, we will set the schedule to trigger the task.

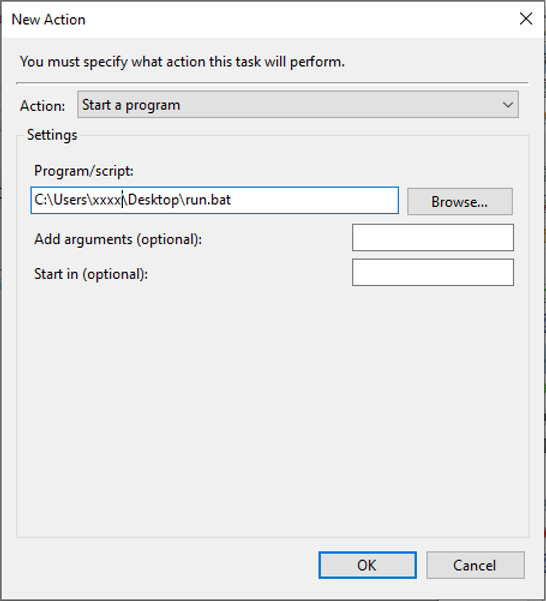
Finally, in the Action tab, we will populate the “Script” field with the full path to the “run” script we created in the steps above.
If you have the Data Management Add on of Tableau you can also schedule the flow directly on Tableau Server or Tableau Online. Please consult this page for further information.
In this article, we have shown how to consolidate your ETL process in one place thanks to Tableau Prep in the 2020.3 release. The numerous connections, not only Snowflake, and the various transformations available in Tableau Prep make the field of possibilities vast. Moreover, the automation of this process will save you precious time in the daily processing of your data.
We hope that you enjoyed this article. If you are curious about Snowflake and/or Tableau Prep, please feel free to reach out to Team Argusa at info@argusa.ch.
With the 2020.3 release of Tableau, it is possible to write to external databases like SQL Server, PostgreSQL, Snowflake and others, via Tableau Prep. We can now use all the transformations possible in Tableau Prep (aggregations, pivots etc.) and load the transformed data directly into our target database, and thus streamline our ETL process. Moreover, it is also possible to schedule this data loading via the task scheduler or on Tableau Server or Tableau Online and automate the ETL process one step further.
In this article, we will go through an example using Tableau Prep and Snowflake. Much more than a database, Snowflake is an integrated data platform, conceived from the ground up for the cloud. Its patented multi-cluster, shared-data architecture features compute, storage and cloud services layers that scale independently, enabling any user to work with any data, with no limits on scale, performance or flexibility.
Throughout this article, we will use the Superstore sample flow available in Tableau Prep to load the data into Snowflake. If you would like a more hands-on experience, you can download a free trial of Tableau Prep here. You can also set up your own Snowflake account by visiting Snowflake here to sign up for a free trial.
Prerequisites
We will first make sure there is a database in our Snowflake account. The screenshot below shows how to create a new Database by clicking on “Databases” on the top left of the screen, and then on “Create”. We will our database “TEST”.
Our new database will be displayed in the list of available databases. We will then click on the database name order to create a new table in this database.
We will name the table “TEST_TABLE” and select the PUBLIC schema that is automatically created with the new database. We have to add at least one column to create the table.
Writing into Snowflake using Tableau Prep
We will now open the Superstore sample flow in Tableau Prep and click on the output step of the flow. In the "Save output to" menu, select "Database table" then select Snowflake as the connection.
Enter the URL of your Snowflake server. In the “Role” field, make sure to enter "ACCOUNTADMIN" as this is the top-level role in the Snowflake system and will ensure you have access to all the objects you have in your Snowflake account. Then enter the username and password of your account.
After connecting to your Snowflake account, select a warehouse that will provide the compute power to execute queries, then select the “TEST” database we created in the above step, and the “PUBLIC” schema. We now have the choice to select an existing table or to create a new one by writing a new table name. In our case, we will select the “TEST_TABLE” that we have created earlier.
Remember that we create the TEST_TABLE but we did not make sure it had all the necessary columns to receive data from our Tableau Prep flow! The magic happens in Snowflake, because it does not require for your data to have the same number of columns as your target table. In order to have that flexibility, we will choose "Create table" in the "Write options" menu because this option is the equivalent of the SQL query "CREATE OR REPLACE TABLE". The options “Append” or “Replace” will only work if the columns in the target table are the same as those in the data that is being loaded.
We will then click on Run Flow and the data will be loaded into Snowflake. We will run a simple query to examine our data that had been freshly loaded into Snowflake.
ETL Automation
We can now go one step further and automate this process. For this, we will build a script that runs the flows without us having to open Tableau Prep. If you are using Windows, you can automate this using the Task Scheduler. For this, we need to create two files using a simple text editor. These files are:
1. A JSON file named “creds” that will contain credentials to connect to the Snowflake account. It's content is shown below
{
	"databaseConnections":[
		{
		"hostname":"mk72096.eu-west-1.snowflakecomputing.com",
		"username":"username",
		"password":"password"
		}
	]
}
2. The script batch file that we will call "run". This file contains the installation directory of Tableau Prep, and the locations of the credential file and the Tableau Prep flow file:
cd
\cd "C:\Program Files\Tableau\Tableau Prep Builder 2021.3\scripts"
tableau-prep-cli.bat -c C:\Users\xxxx\Desktop\creds.json
-t C:\Users\xxxx\Desktop\Superstore.tflx
Please note that the credential file implies that your Snowflake password is written in plain text.
We will now open the Task Scheduler, click on Create Task and give a name to the task in the General tab.
In the Triggers tab, we will set the schedule to trigger the task.
Finally, in the Action tab, we will populate the “Script” field with the full path to the “run” script we created in the steps above.
If you have the Data Management Add on of Tableau you can also schedule the flow directly on Tableau Server or Tableau Online. Please consult this page for further information.
In this article, we have shown how to consolidate your ETL process in one place thanks to Tableau Prep in the 2020.3 release. The numerous connections, not only Snowflake, and the various transformations available in Tableau Prep make the field of possibilities vast. Moreover, the automation of this process will save you precious time in the daily processing of your data.
We hope that you enjoyed this article. If you are curious about Snowflake and/or Tableau Prep, please feel free to reach out to Team Argusa at info@argusa.ch.