Send multiple custom e-mails with your Tableau dashboard

Tableau’s URL actions are an extremely powerful tool, that allow you to access web-based resources through your dashboards. Here we will show how URL actions can be used to automate e-mail sending.
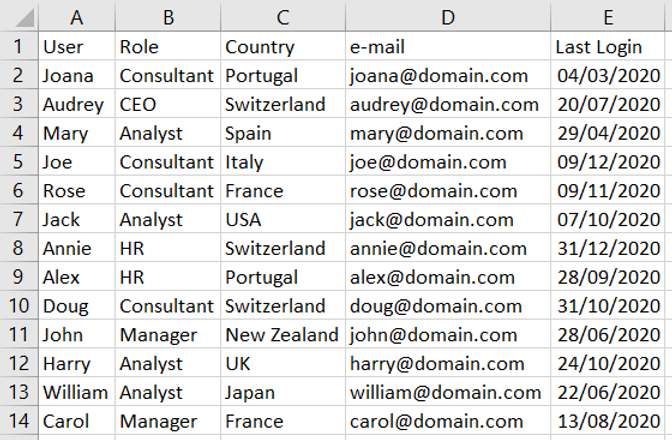
Consider the following data, showing information about different users and the date they last logged into a fictitious system.
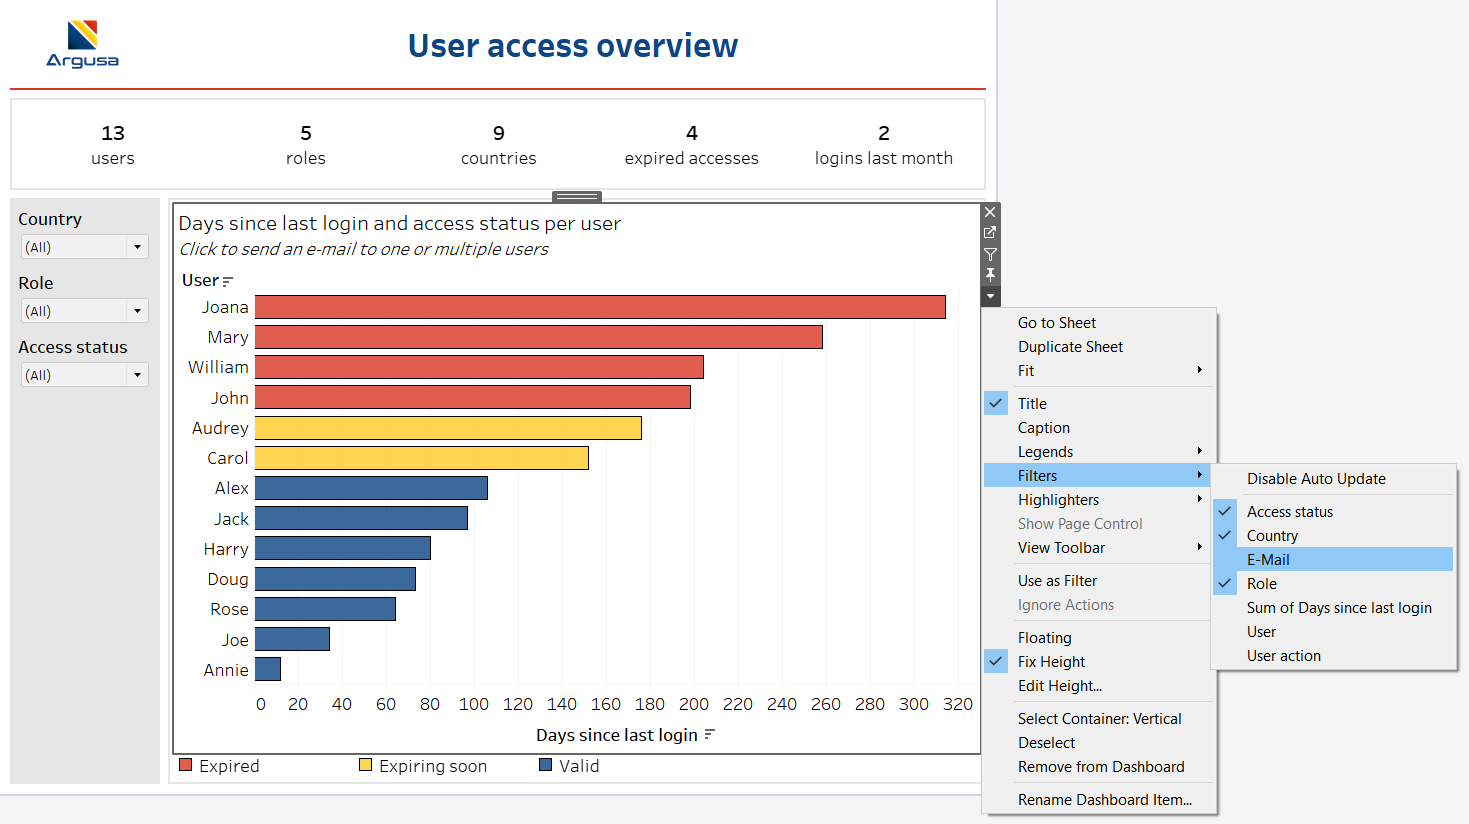
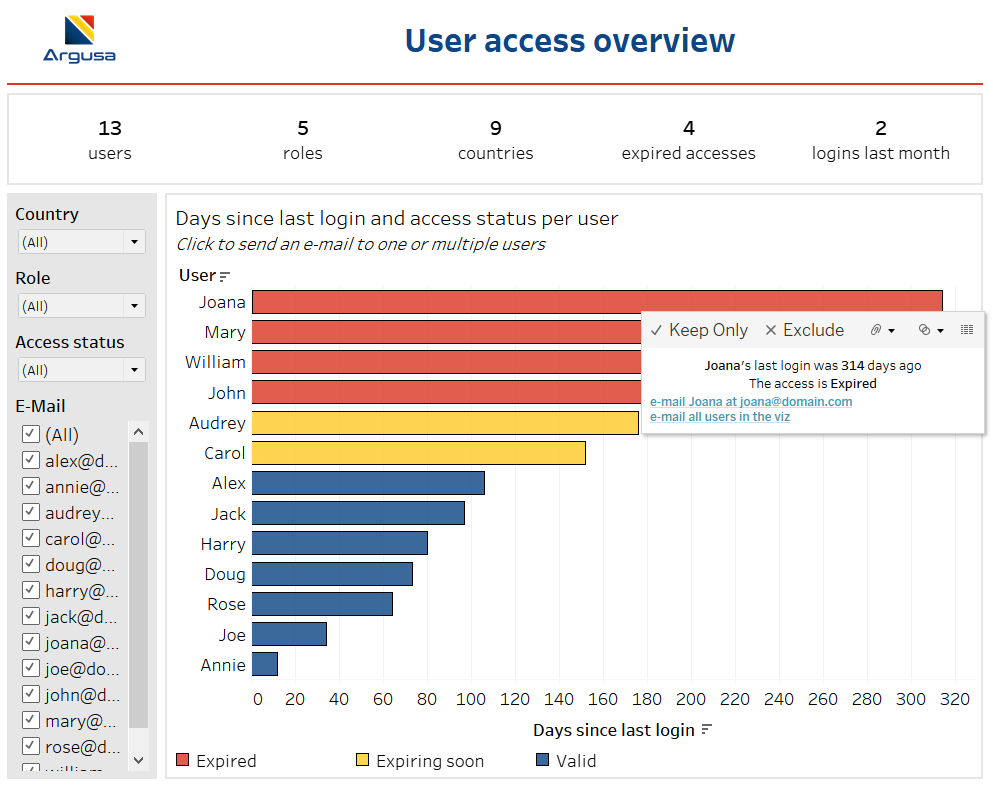
Our goal is to create a dashboard to monitor the access of the different users into the system. Here is a screenshot of a simple dashboard we can develop using this data source. The dashboard shows generic information about the data on top and a bar chart with the number of days since the last login for the different users.
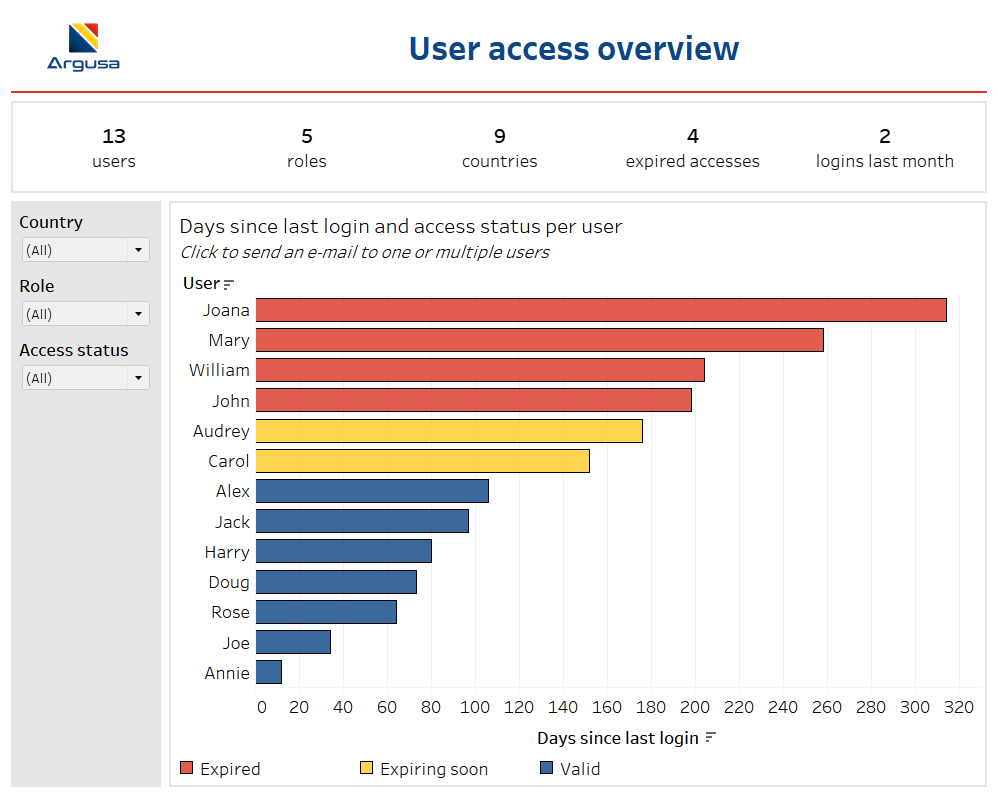
The access to the system expires if a user does not login within 6 months, so the bars are colored according to the status of the access: “Expired” for users who have not logged in 6 months; “Expiring soon” for users whose access while expire within a month; and “Valid” for users who have recently logged into the system.
The dashboard shows Audrey’s access will expire soon, so it would be nice to be able to notify Audrey of this directly from the Tableau dashboard. Because we have the user e-mail information in the data source, we can set up a URL action to send Audrey (or any other user in the viz) an e-mail.

As you can see, we defined a URL action that runs on the Menu option of the bar chart. The action is simply
mailto: <E-Mail>This is what it looks like in the viz.
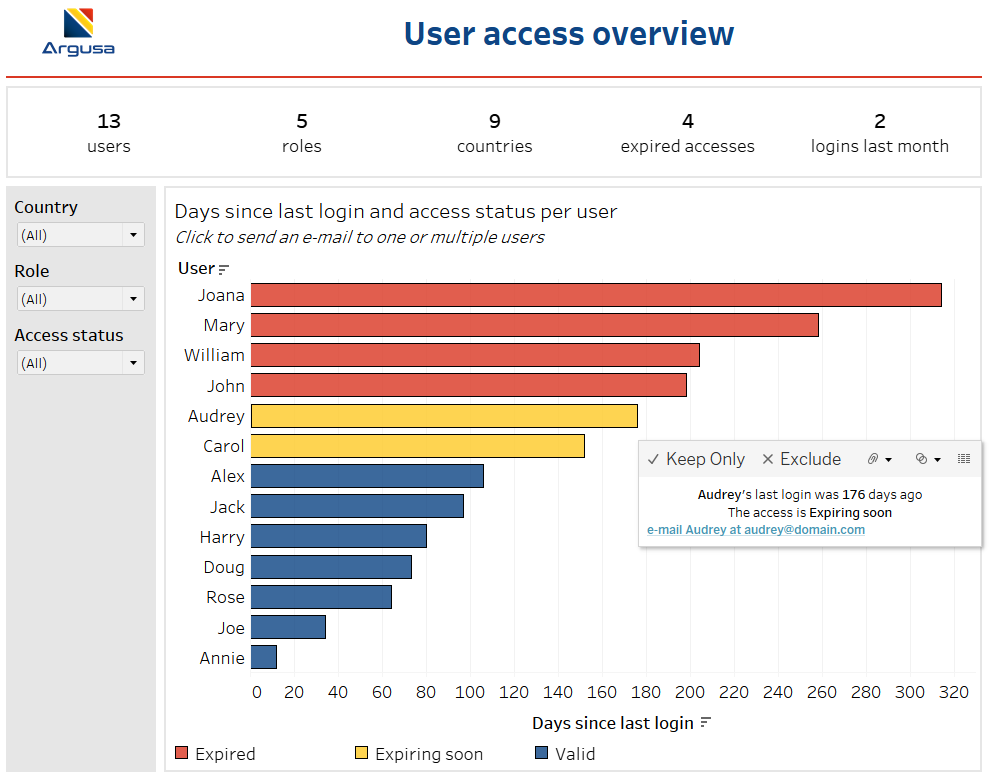
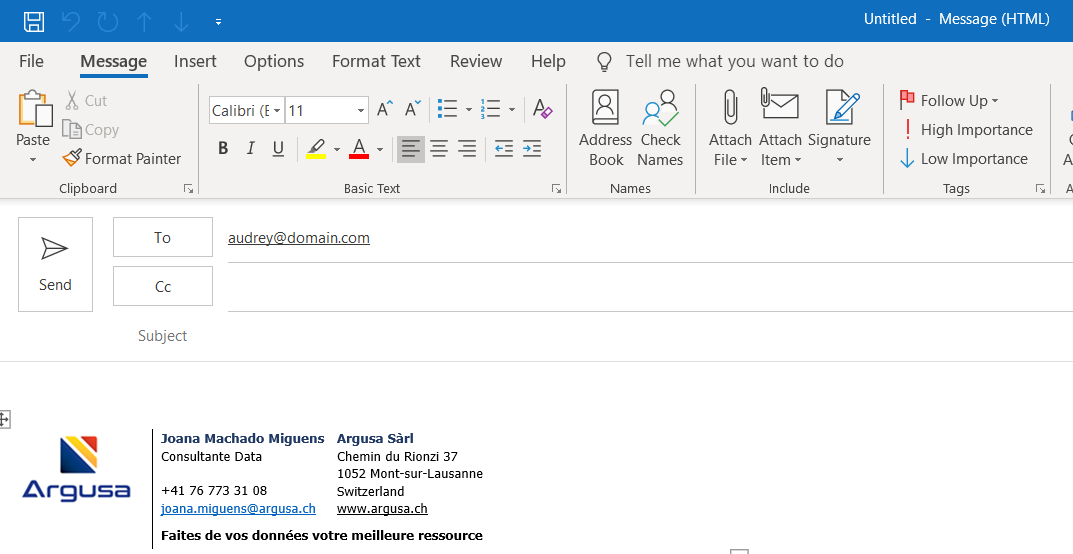
If we click “e-mail Audrey at audrey@domain.com”, our predefined e-mail client should pop up.
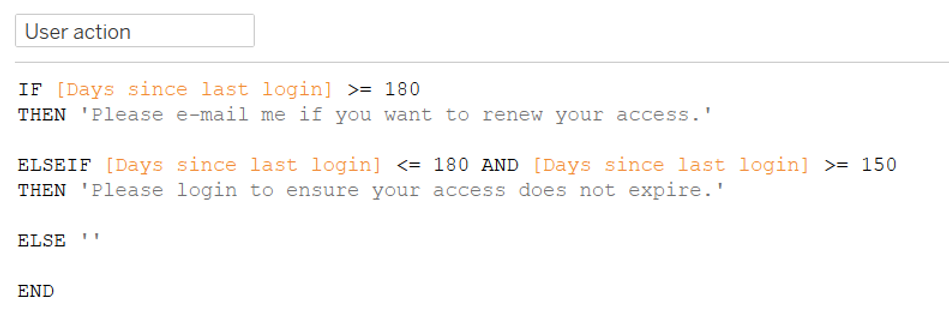
At this point we can type a message to Audrey directly on the e-mail client, or we can modify our URL action to do the job for us. Let us first create a calculation containing a status-dependent sentence that we can include in the e-mail message.
We can then edit the URL action as follows.
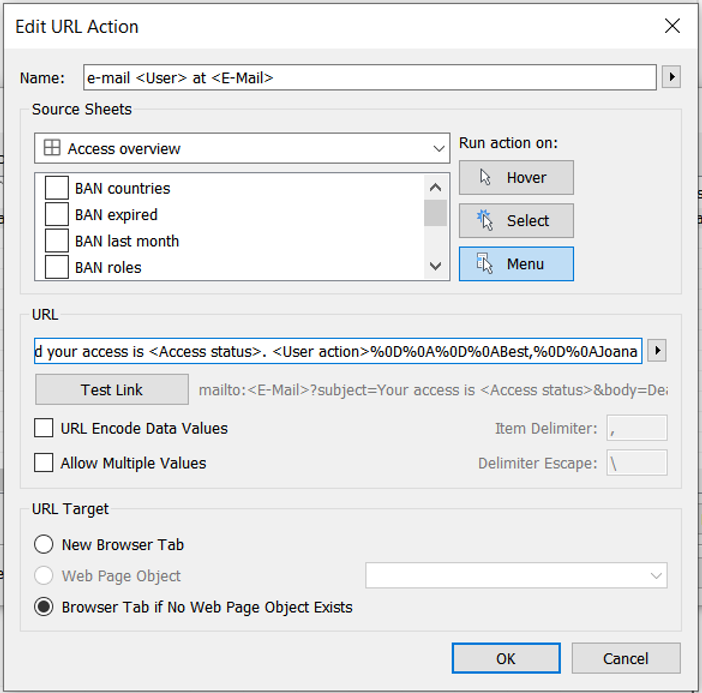
For clarity, here is the new full URL
mailto:<E-Mail>?subject=Your access is <Access status>&body=Dear <User>,%0D%0A%0D%0AYour last login was <SUM(Days since last login)> days ago and your access is <Access status>. <User action>%0D%0A%0D%0ABest,%0D%0AJoanaAs you can see, you can specify the subject and body of your e-mail, and use the following to encode line breaks
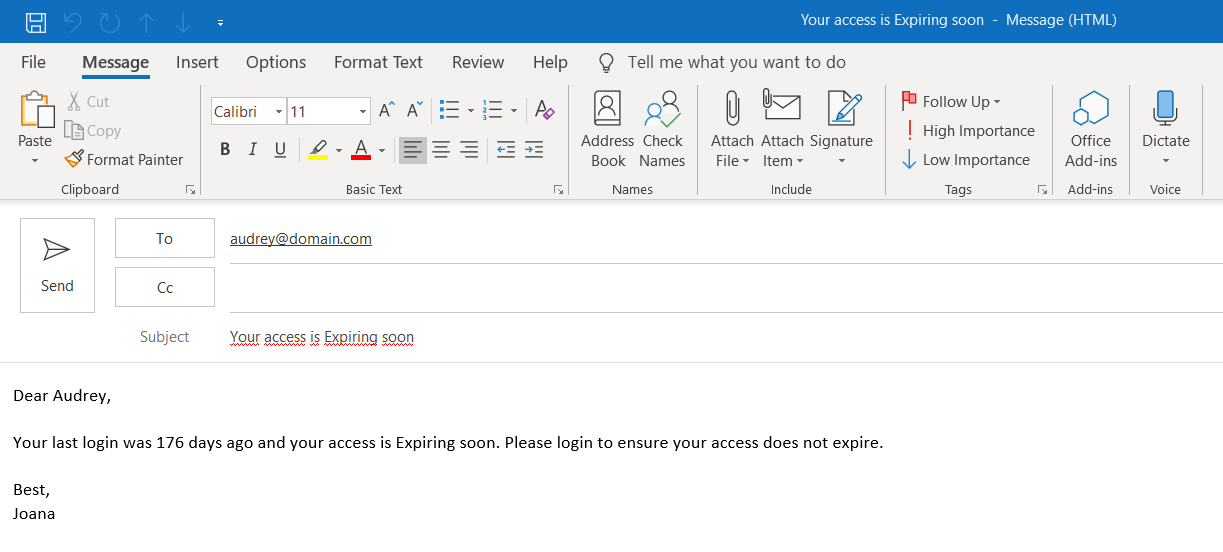
%0D%0A Here is the outcome of the updated URL action on an e-mail client.
Now let us take these URL actions one step further. The dashboard shows there are 4 expired accesses, and it would be great to e-mail all those users in one go, instead of clicking separately on each of them (keep in mind this is a simplified example, in the real world you will likely deal with hundreds of users).
To e-mail multiple users we need to start by showing the filter on the e-mail field.
Let us now set up a new URL action.
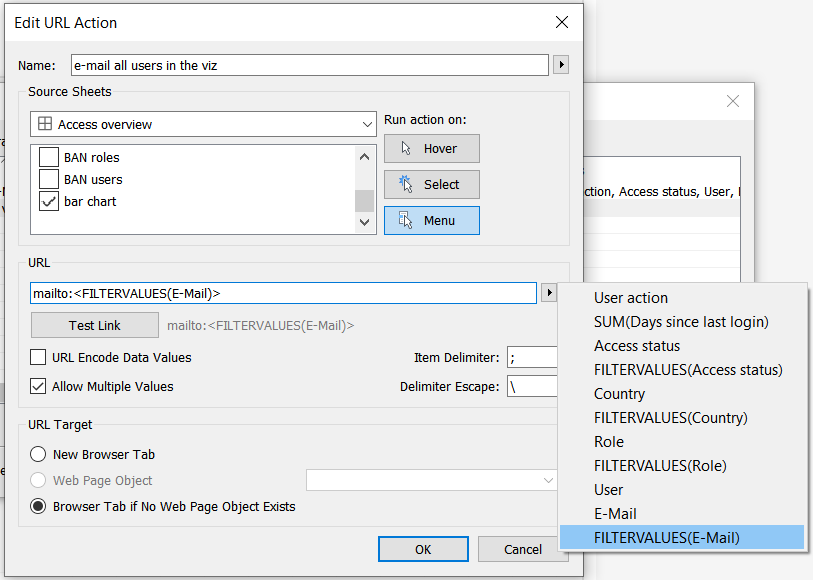
Notice that this time we ticked the option “Allow multiple Values” and picked as “Item Delimiter” whatever the e-mail client uses to separate multiple e-mail addresses (in our case a semi-colon). More important, because we enabled the filter on the e-mail field, we now have a new option available for the URL: FILTERVALUES(E-Mail).
We therefore set up the URL as
mailto: <FILTERVALUES(E-Mail)>This is what the new action looks like on our dashboard (we will deal with the e-mail filter later).
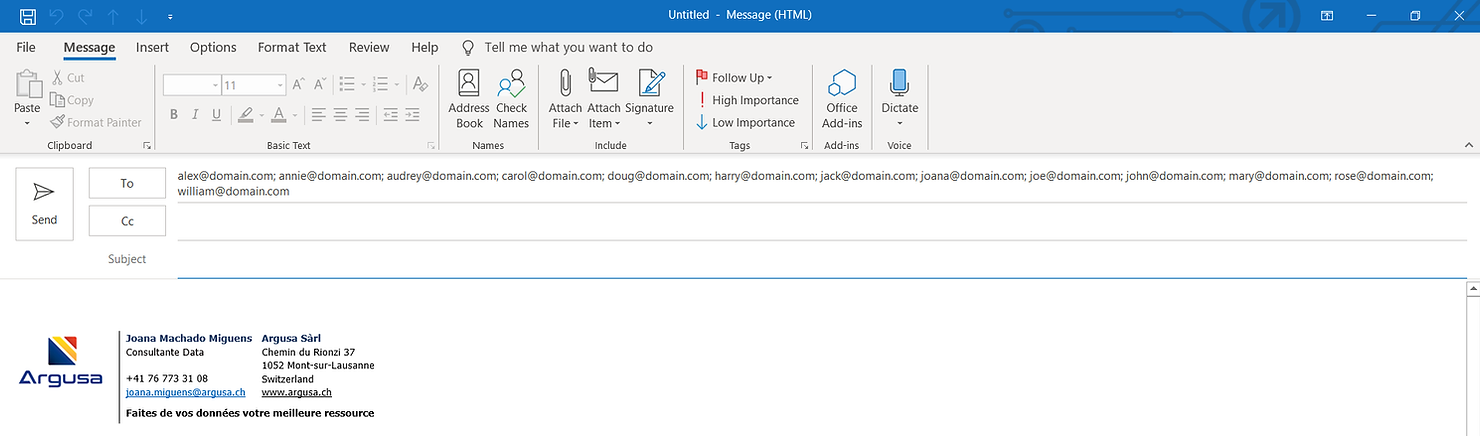
And if we click “e-mail all users in the viz” we get an e-mail template for all 13 users in the viz.
But remember, what we want is to e-mail the 4 users with expired accesses, so let’s filter our viz and click “e-mail all users in the viz” once again.

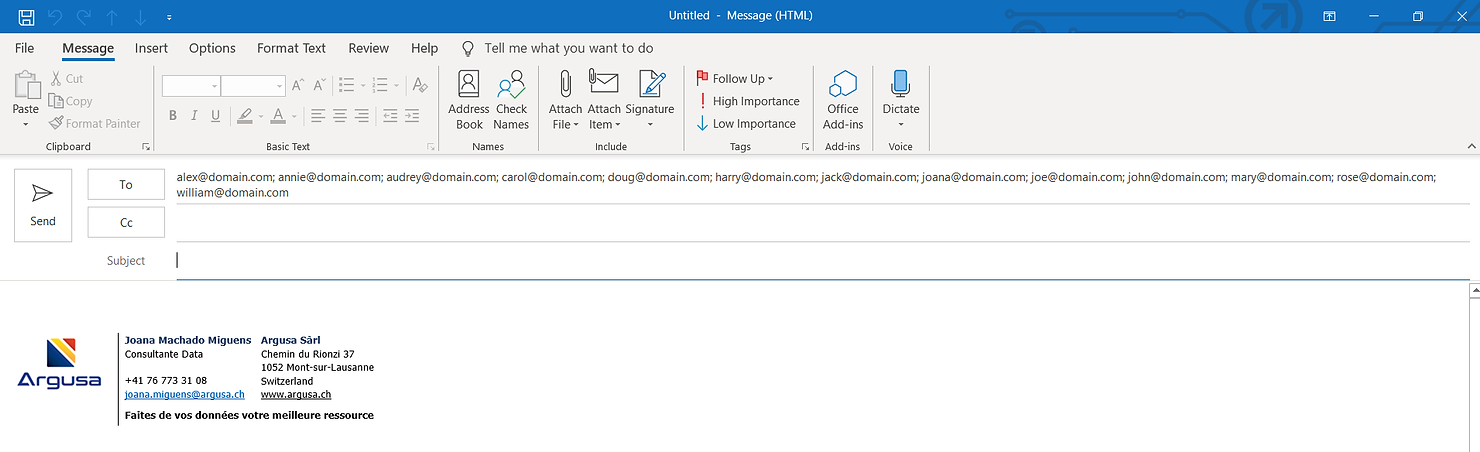
As you can see the e-mail still has all 13 users, which is not what we want. However, keep in mind we are using the filter values of e-mail in the URL action, so let’s modify our e-mail filter to show only relevant values instead of all values.
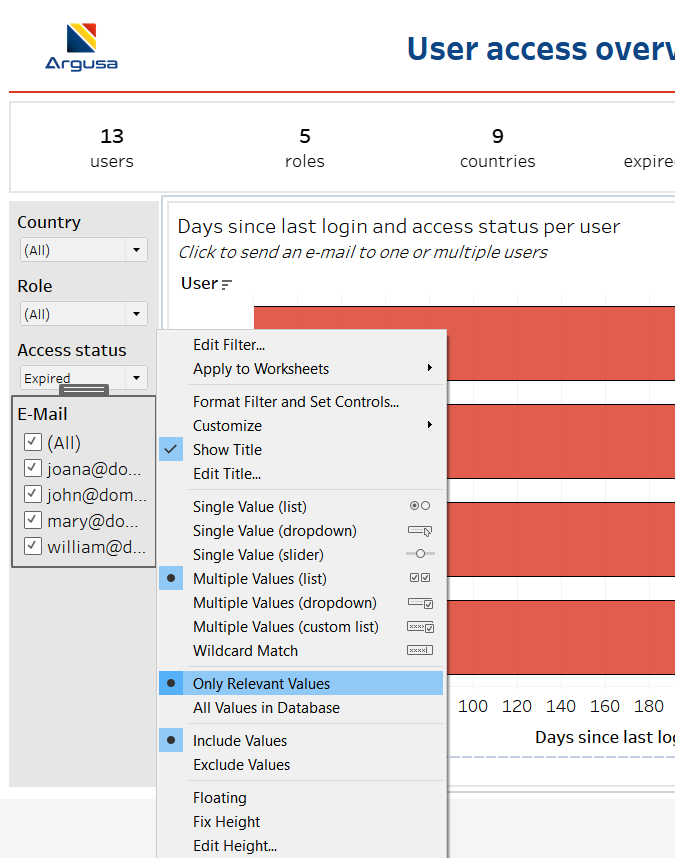
If we now click the “e-mail all users in the viz” action we get the e-mail template we wanted, with only the 4 users in the viz.

We can improve the generated e-mail by again creating an informative calculated field.

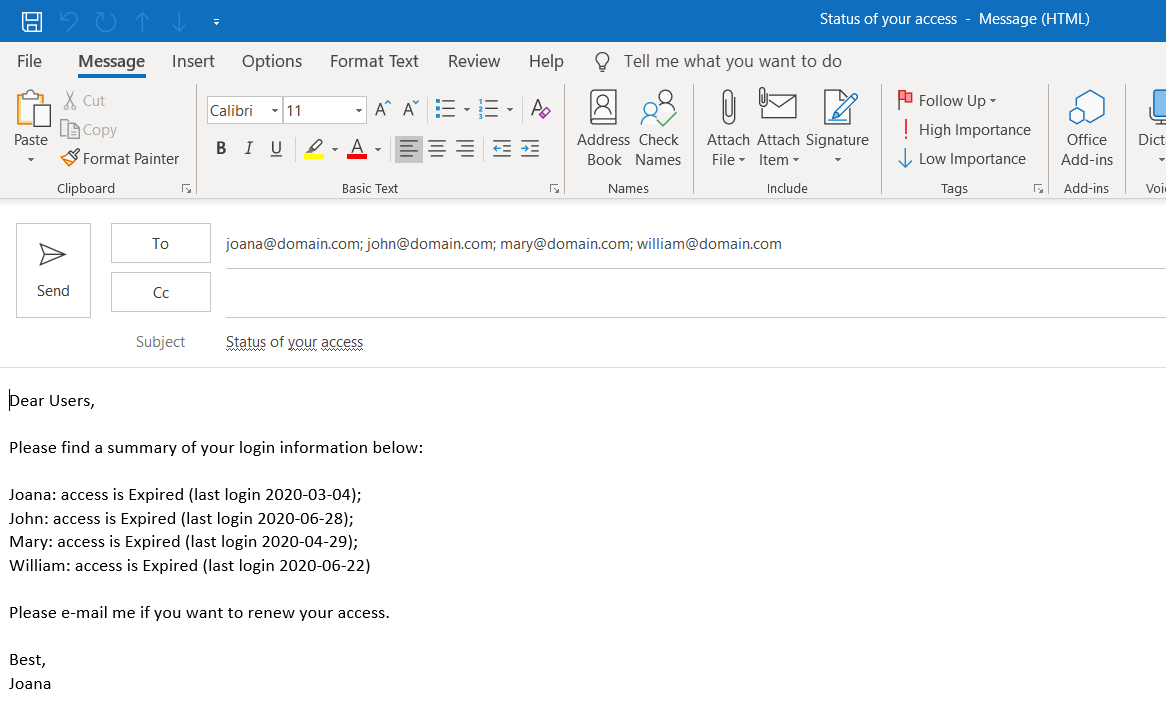
Similar to the e-mail field, we will want to show the filter for this new calculated “User summary” field. We can then update our new URL action with
mailto:<FILTERVALUES(E-Mail)>&subject=Status of your access&body=Dear Users,%0D%0A%0D%0APlease find a summary of your login information below:%0D%0A<FILTERVALUES(User summary)>%0D%0A%0D%0A<User action>%0D%0A%0D%0ABest,%0D%0AJoanaIn this case the action will generate the following e-mail.
Or if we do not want to share the login information with all users we can use the bcc option and write a more generic message
mailto:?bcc=<FILTERVALUES(E-Mail)>&subject=Your access is <Access status>&body=Dear User,%0D%0A%0D%0AYour access is <Access status>. <User action>%0D%0A%0D%0ABest,%0D%0AJoana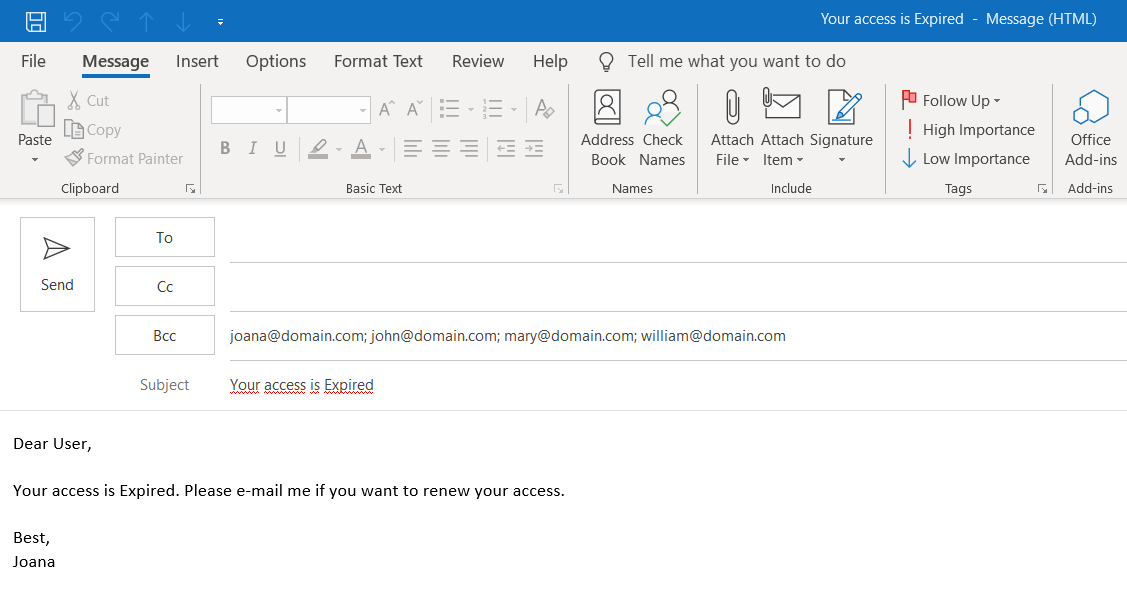
The only thing left to do is some cleanup of the dashboard, which at this point shows a few filters that are only used for the URL actions, but would be irrelevant for anyone using the dashboard to monitor the system. These filters cannot be removed from the dashboard, otherwise the URL actions will no longer work as desired, but we can simply “hide” them, by making them small floating objects (as you will see below 1 px in width and height).
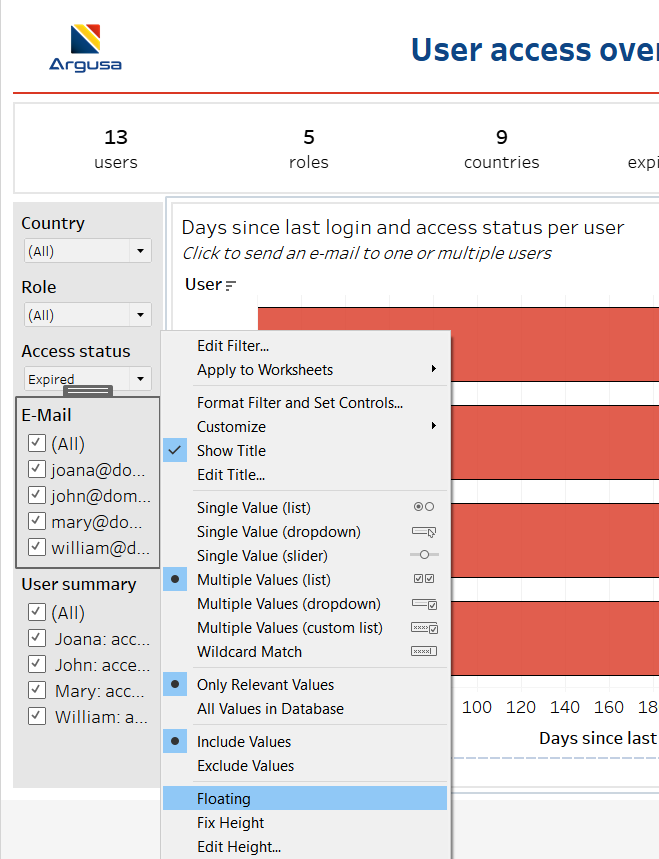

Remember, the end-user will not really see these filters when using the dashboard, but you can always use the “Item hierarchy” feature to find and select them if needed.
Tableau’s URL actions are an extremely powerful tool, that allow you to access web-based resources through your dashboards. Here we will show how URL actions can be used to automate e-mail sending.
Consider the following data, showing information about different users and the date they last logged into a fictitious system.
Our goal is to create a dashboard to monitor the access of the different users into the system. Here is a screenshot of a simple dashboard we can develop using this data source. The dashboard shows generic information about the data on top and a bar chart with the number of days since the last login for the different users.
The access to the system expires if a user does not login within 6 months, so the bars are colored according to the status of the access: “Expired” for users who have not logged in 6 months; “Expiring soon” for users whose access while expire within a month; and “Valid” for users who have recently logged into the system.
The dashboard shows Audrey’s access will expire soon, so it would be nice to be able to notify Audrey of this directly from the Tableau dashboard. Because we have the user e-mail information in the data source, we can set up a URL action to send Audrey (or any other user in the viz) an e-mail.
As you can see, we defined a URL action that runs on the Menu option of the bar chart. The action is simply
mailto: <E-Mail>This is what it looks like in the viz.
If we click “e-mail Audrey at audrey@domain.com”, our predefined e-mail client should pop up.
At this point we can type a message to Audrey directly on the e-mail client, or we can modify our URL action to do the job for us. Let us first create a calculation containing a status-dependent sentence that we can include in the e-mail message.
We can then edit the URL action as follows.
For clarity, here is the new full URL
mailto:<E-Mail>?subject=Your access is <Access status>&body=Dear <User>,%0D%0A%0D%0AYour last login was <SUM(Days since last login)> days ago and your access is <Access status>. <User action>%0D%0A%0D%0ABest,%0D%0AJoanaAs you can see, you can specify the subject and body of your e-mail, and use the following to encode line breaks
%0D%0A Here is the outcome of the updated URL action on an e-mail client.
Now let us take these URL actions one step further. The dashboard shows there are 4 expired accesses, and it would be great to e-mail all those users in one go, instead of clicking separately on each of them (keep in mind this is a simplified example, in the real world you will likely deal with hundreds of users).
To e-mail multiple users we need to start by showing the filter on the e-mail field.
Let us now set up a new URL action.
Notice that this time we ticked the option “Allow multiple Values” and picked as “Item Delimiter” whatever the e-mail client uses to separate multiple e-mail addresses (in our case a semi-colon). More important, because we enabled the filter on the e-mail field, we now have a new option available for the URL: FILTERVALUES(E-Mail).
We therefore set up the URL as
mailto: <FILTERVALUES(E-Mail)>This is what the new action looks like on our dashboard (we will deal with the e-mail filter later).
And if we click “e-mail all users in the viz” we get an e-mail template for all 13 users in the viz.
But remember, what we want is to e-mail the 4 users with expired accesses, so let’s filter our viz and click “e-mail all users in the viz” once again.
As you can see the e-mail still has all 13 users, which is not what we want. However, keep in mind we are using the filter values of e-mail in the URL action, so let’s modify our e-mail filter to show only relevant values instead of all values.
If we now click the “e-mail all users in the viz” action we get the e-mail template we wanted, with only the 4 users in the viz.
We can improve the generated e-mail by again creating an informative calculated field.
Similar to the e-mail field, we will want to show the filter for this new calculated “User summary” field. We can then update our new URL action with
mailto:<FILTERVALUES(E-Mail)>&subject=Status of your access&body=Dear Users,%0D%0A%0D%0APlease find a summary of your login information below:%0D%0A<FILTERVALUES(User summary)>%0D%0A%0D%0A<User action>%0D%0A%0D%0ABest,%0D%0AJoanaIn this case the action will generate the following e-mail.
Or if we do not want to share the login information with all users we can use the bcc option and write a more generic message
mailto:?bcc=<FILTERVALUES(E-Mail)>&subject=Your access is <Access status>&body=Dear User,%0D%0A%0D%0AYour access is <Access status>. <User action>%0D%0A%0D%0ABest,%0D%0AJoanaThe only thing left to do is some cleanup of the dashboard, which at this point shows a few filters that are only used for the URL actions, but would be irrelevant for anyone using the dashboard to monitor the system. These filters cannot be removed from the dashboard, otherwise the URL actions will no longer work as desired, but we can simply “hide” them, by making them small floating objects (as you will see below 1 px in width and height).
Remember, the end-user will not really see these filters when using the dashboard, but you can always use the “Item hierarchy” feature to find and select them if needed.