Dealing with several naming conventions in data source fields in Tableau Prep

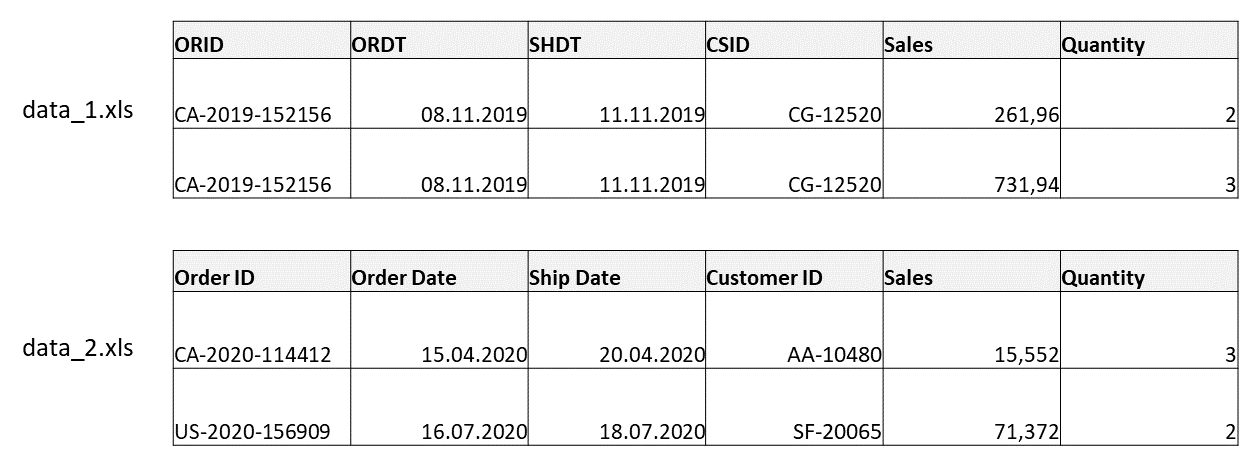
While dealing with multiple data sources as input for a prep flow, it is common to encounter different column names for the same field. An example is shown below, where two sources contain the same fields, i.e. the order ID, the order date, the ship date, the customer ID and the sales and the quantity; except that for the first four columns, the two data sources have different column names!
A union of these two datasets will give the following result, which is not an optimal data structure for analytics purposes.

In this blog, we present robust solutions to deal with the following cases (and similar ones):
- We are not sure, which of the two (or many) naming conventions the input data uses for our prep flow. For instance, you can have data sources from different countries with fields in their languages, but you want them in English.
- The fields of a single data source have been renamed. This could happen after a database migration for instance.
All the material used in this blog, data and Tableau Prep files, can be found at this link.
The first step is to create an empty template file containing the names of all the fields as header.

Notice that we have included all possible names of the input columns, for example, “ORID” and “Order ID” for “Order ID” etc.
We now create a union of this template file with the input data. This ensures that all the fields are used regardless of the naming convention of the input data.
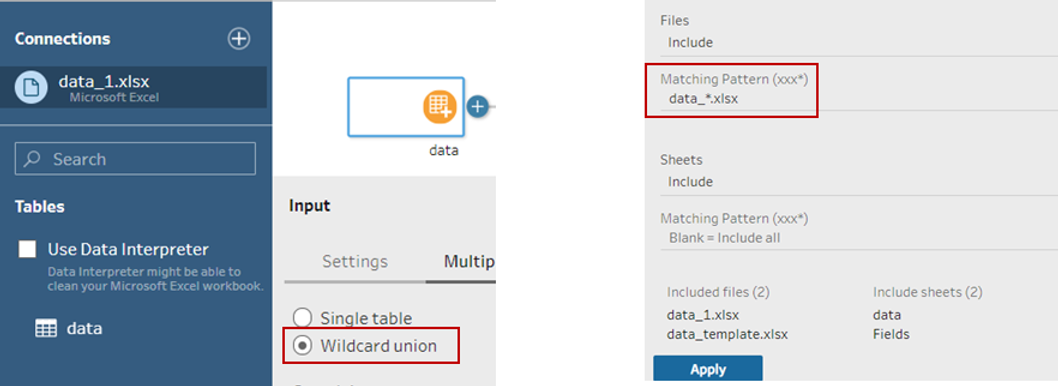
For our example, we will use a wildcard union. We have three files:
- data_1.xls: uses “ORID”, “ORDT”, “SHDT”, “CSID”
- data_2.xls: uses “Order ID”, “Order Date”, “Ship Date”, “Customer ID”
- data_template.xls: the empty table with all the names as headers
We will first only use the data file “data_1.xls”, this simulates a case where we want to rename the fields of a single data source using another convention. We will then omit for now the “data_2.xls” file by adding an underscore _ at the beginning of its file name.
In the input step, after we click on wildcard union we write “data_*.xls” in matching pattern and click apply.

The result is the first dataset with columns of the second naming scheme filled with Nulls for each row, as desired.
At this point will show three methods to merge the fields such that we use only one naming convention at end of the flow. In this example, we want to use the convention of the second data file.
1) Merge fields by hand
In a cleaning step we click first “Order ID” and press CTRL (Cmd on a Mac), then on “ORID” and then on Merge Fields as shown below. This ensure that “Order ID” is used for the name of the merged field. We repeat that procedure for the other fields and we obtain a table where the names of the fields have been correctly converted.

This method is very simple. However, it can be quite tedious to merge many fields by hand. The two following methods propose an alternative solving this issue.
2) Merge fields with calculations
Here we propose a method where names from one convention can be easily transformed to another convention using calculations, for instance:
- In our example, the prefix of the names of data_1.xls “OR”, “SH” and “CS” are can be converted to “Order “, “Ship “ and “Customer” using the REPLACE function with IF and ELSE statements. The ending “DT” can be converted to “Date”.
- Imagine a data source with field’s names like “A – a1, A – a2, B – b1, B - b2” and in another convention fields are named as “a1, a2, b1, b2”. Here the conversion between the two conventions can be performed using the SPLIT function on the names of the first conventions.
The principle of the method is to apply a pivot transformation from columns to rows on the data, convert the names, and pivot again from rows to columns.
- First in a cleaning step, we will create a field that has a unique value for each row (it might already exists in the data), using the function ROW_NUMBER.
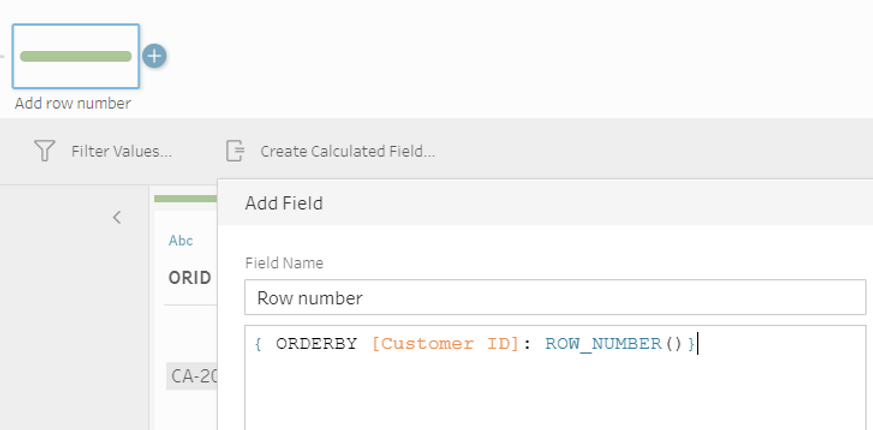
Put the ROW_NUMBER function between curly braces with an ORDERBY statement, here we choose “Customer ID” arbitrarily. The picture below shows the result:

- Now let us create a pivot, column to rows, step where you need to drag and drop all the fields, except “Row number”, as shown in the picture below.

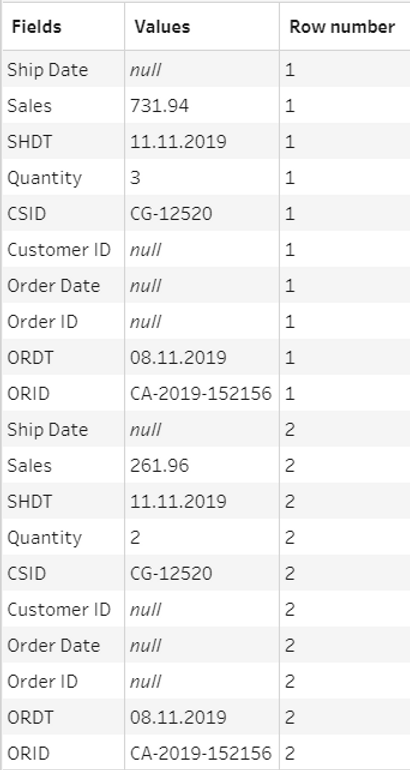
- We rename “Pivot1 Names” to “Field” and “Pivot1 Values” to “Values”.
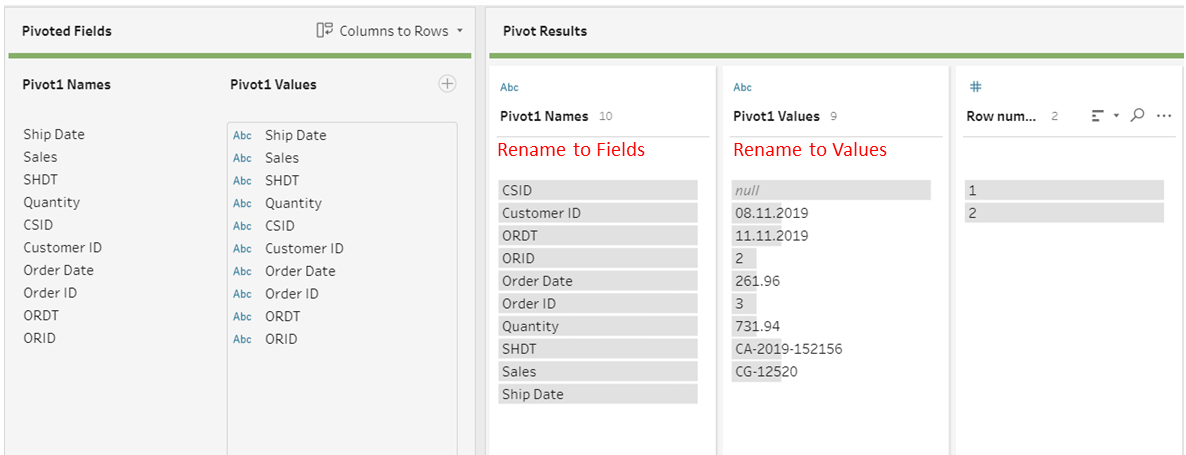
This is the pivoted table obtained after this step:
- We add a new cleaning step, where we will convert the names. For our particular example, we will create two calculated fields shown in the picture below. The first one will convert the prefixes and the second the keys of the names used in data_1.xls.
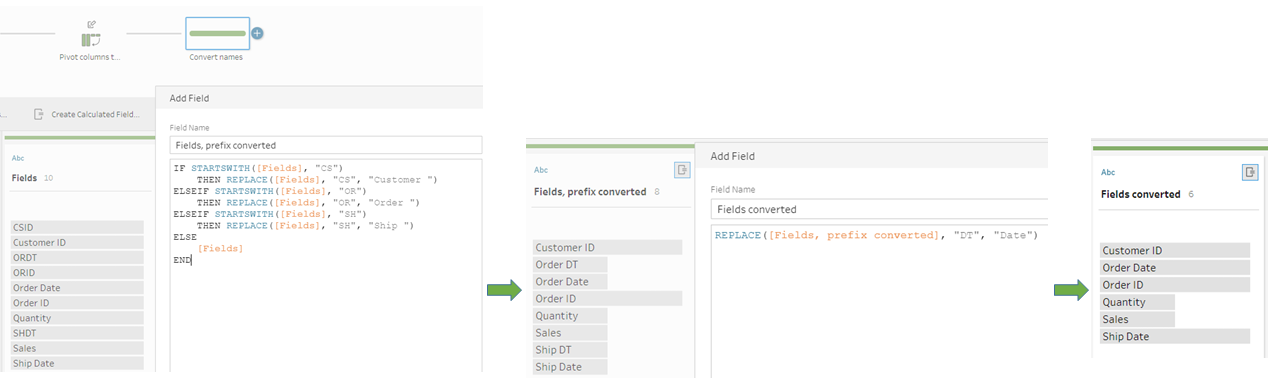
Our new calculated field “Fields converted” now contains only names of the second naming convention. We should now keep only the fields “Row number”, “Fields converted” and “Values”.
- We now add a final pivot rows to columns step. We drag “Fields converted” to pivoted fields, and drag “Values” to field to aggregate using the MIN or MAX aggregate function.

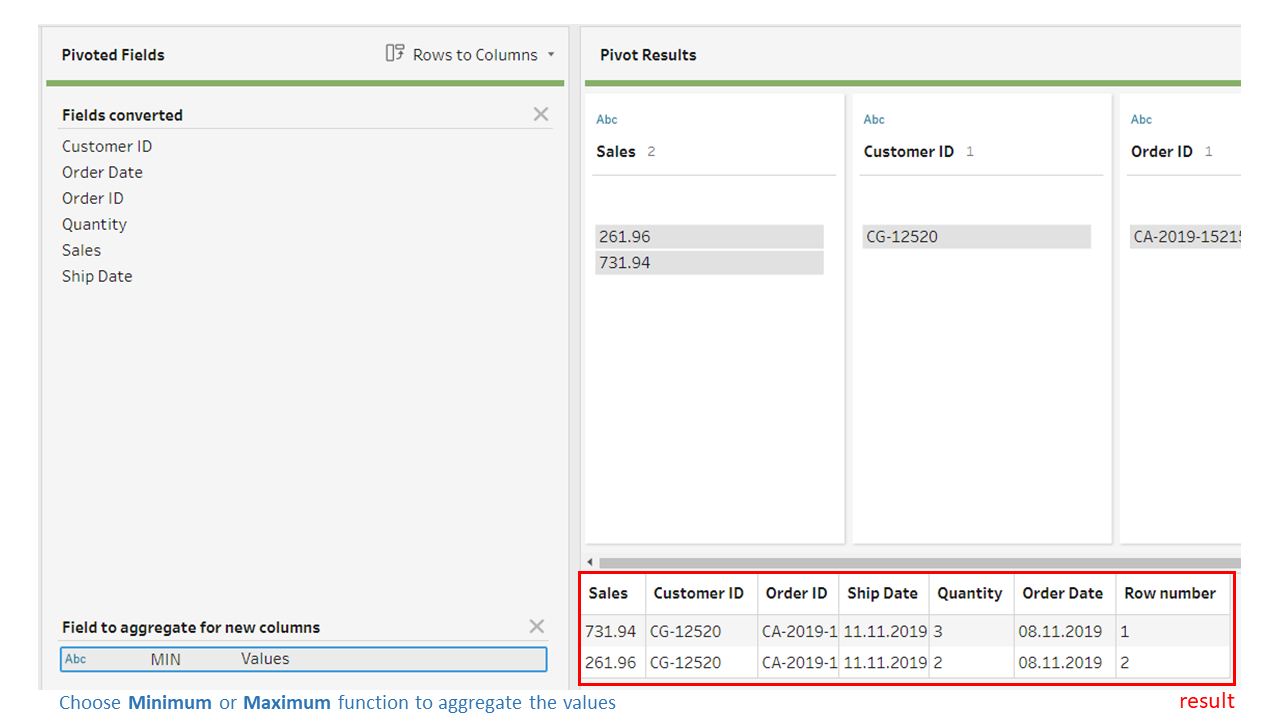
This produces the desired output.
3) Merge fields with a dictionary
This method proposes a way to merge fields when you cannot convert names from one convention to another with very few calculated fields. It uses instead a dictionary mapping the names of convention to another one. We created the dictionary in an excel file:

It is a generalization of the second method and uses the same initial and final steps in the flow.
- Starting from the pivot, columns to rows, step of the previous method, we create two cleaning steps as placeholders and we input the dictionary as shown below.

- We then do a right-join of the placeholder 1 column “Fields” with the dictionary column “Fields 1”, and another right-join of the placeholder column “Fields” with the dictionary column “Fields 2”.

The results of each join step are shown on the pictures below:

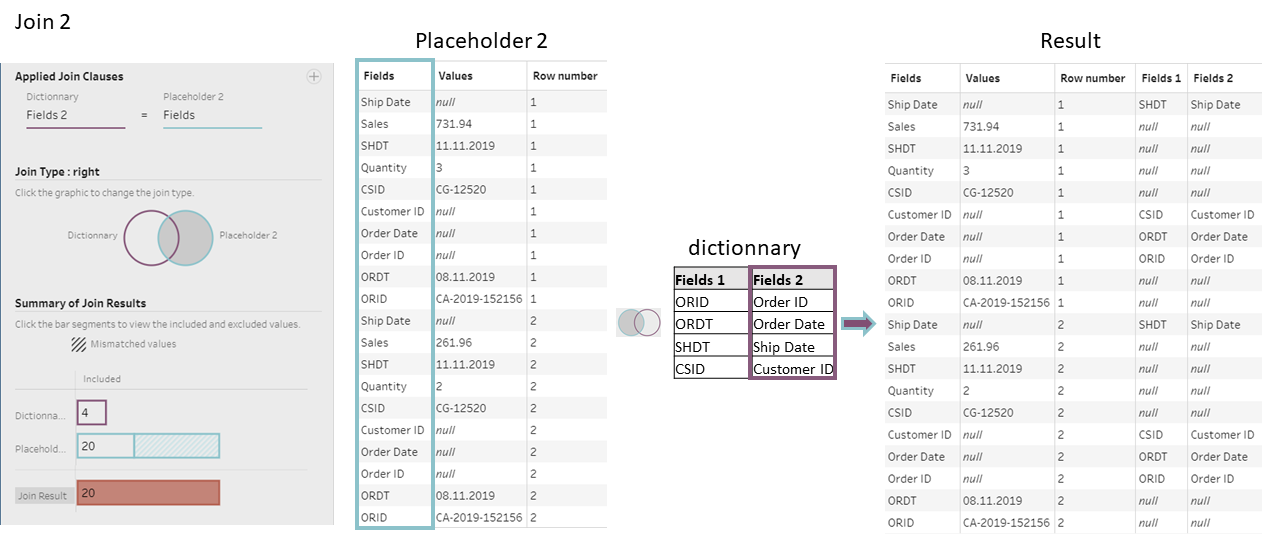
The field “Fields 1” is removed from each join step, as it will not be used afterward.
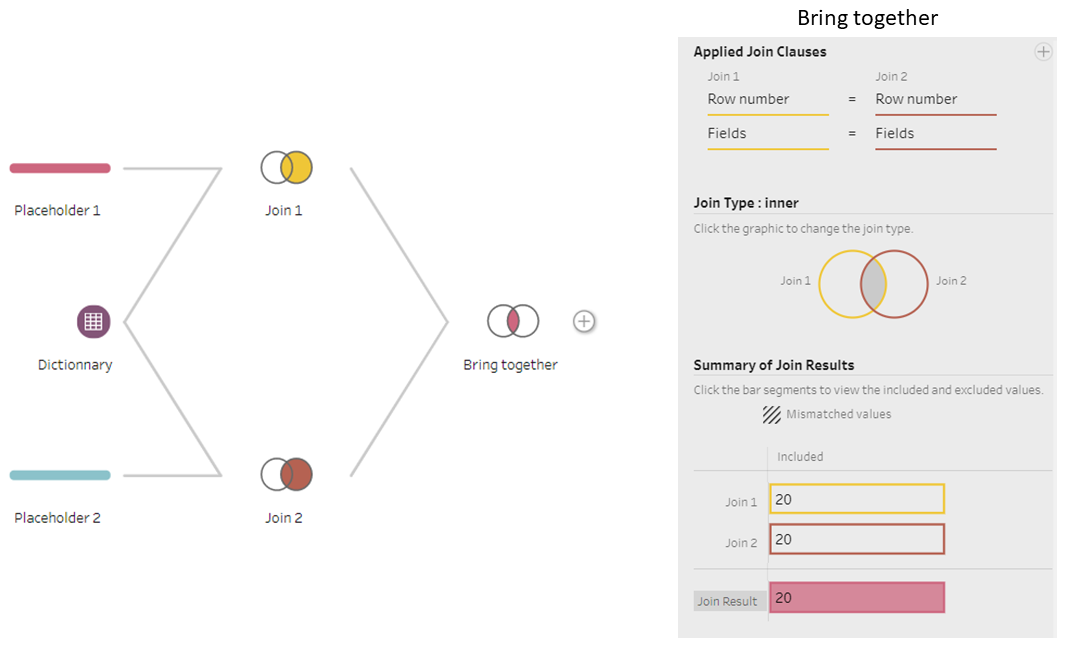
- We can now bring back Join 1 and Join 2 together using an inner join on the “Fields” and “Row number” columns. The two fields are needed in the join clause in order to have a one to one relationship.
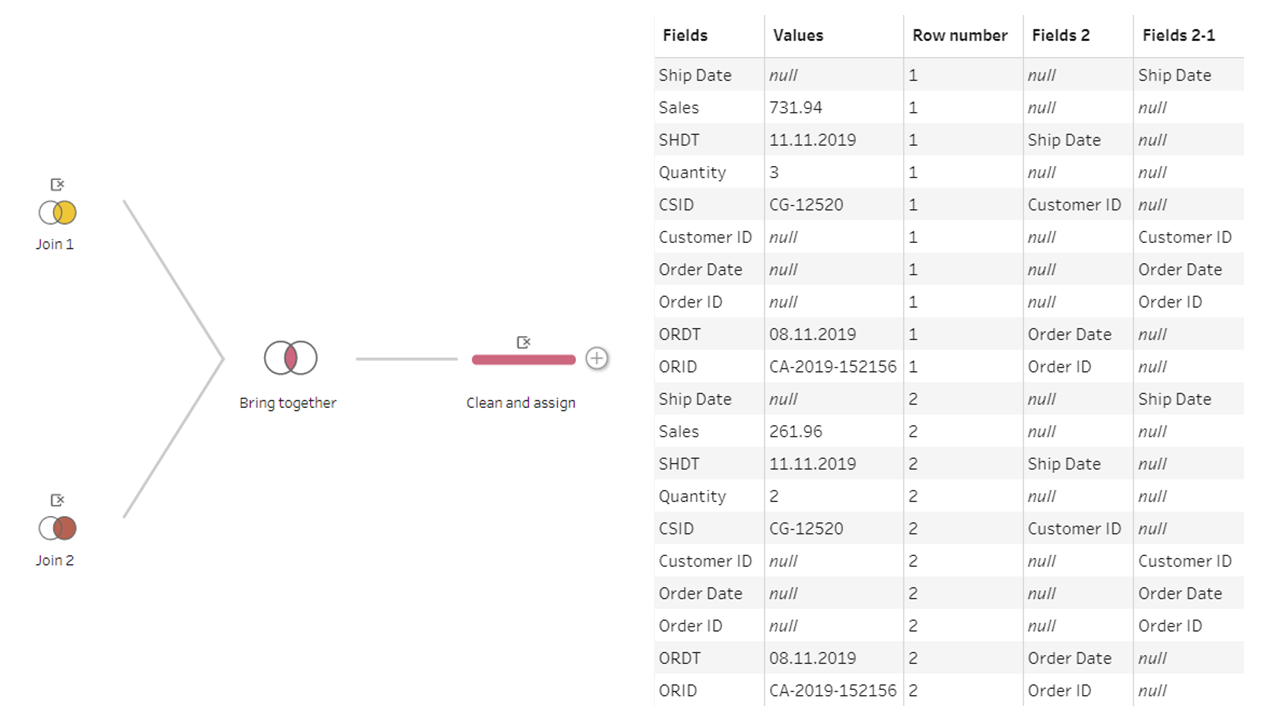
- In a new cleaning step, we remove the duplicated columns for “Fields”, “Row number” and “Values”. We however keep the duplicated columns for “Fields 2”. The picture below shows the table we currently have.
In the same step, we create a calculated field that will assign the names as shown below.

- Now we keep only the columns “Names”, “Values” and “Row number” and add a pivot columns to rows step exactly like the last step in the second method.

Final words
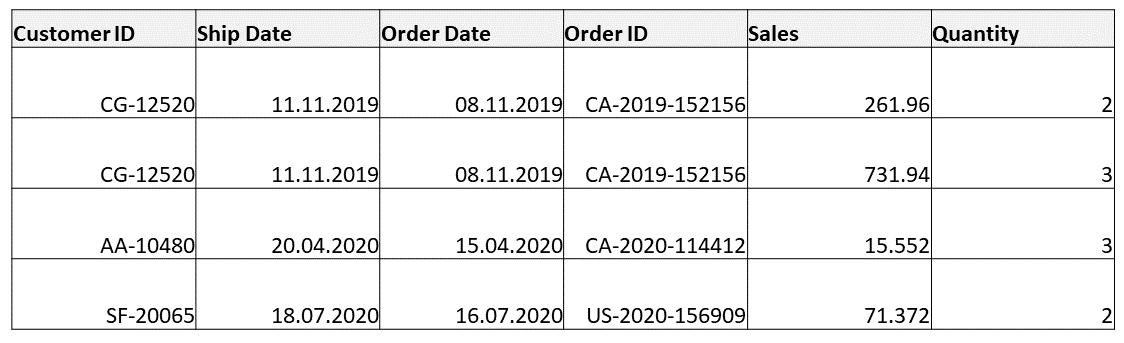
Let us rename the file “_data_2.xls” to “data_2.xls” and refresh the flow. What we obtain at the output of each of the method described before is the table below. Fields of the two data files are correctly merged using the convention of “data_2.xls”, proving that this method also works when using two data sources with two different naming conventions.
With this simple solution, you can seamlessly deal with situations where you have different naming schemes in your data source and do not have to worry which one is used. The examples use with two naming conventions but this solution works with more.
While dealing with multiple data sources as input for a prep flow, it is common to encounter different column names for the same field. An example is shown below, where two sources contain the same fields, i.e. the order ID, the order date, the ship date, the customer ID and the sales and the quantity; except that for the first four columns, the two data sources have different column names!
A union of these two datasets will give the following result, which is not an optimal data structure for analytics purposes.
In this blog, we present robust solutions to deal with the following cases (and similar ones):
- We are not sure, which of the two (or many) naming conventions the input data uses for our prep flow. For instance, you can have data sources from different countries with fields in their languages, but you want them in English.
- The fields of a single data source have been renamed. This could happen after a database migration for instance.
All the material used in this blog, data and Tableau Prep files, can be found at this link.
The first step is to create an empty template file containing the names of all the fields as header.
Notice that we have included all possible names of the input columns, for example, “ORID” and “Order ID” for “Order ID” etc.
We now create a union of this template file with the input data. This ensures that all the fields are used regardless of the naming convention of the input data.
For our example, we will use a wildcard union. We have three files:
- data_1.xls: uses “ORID”, “ORDT”, “SHDT”, “CSID”
- data_2.xls: uses “Order ID”, “Order Date”, “Ship Date”, “Customer ID”
- data_template.xls: the empty table with all the names as headers
We will first only use the data file “data_1.xls”, this simulates a case where we want to rename the fields of a single data source using another convention. We will then omit for now the “data_2.xls” file by adding an underscore _ at the beginning of its file name.
In the input step, after we click on wildcard union we write “data_*.xls” in matching pattern and click apply.
The result is the first dataset with columns of the second naming scheme filled with Nulls for each row, as desired.
At this point will show three methods to merge the fields such that we use only one naming convention at end of the flow. In this example, we want to use the convention of the second data file.
1) Merge fields by hand
In a cleaning step we click first “Order ID” and press CTRL (Cmd on a Mac), then on “ORID” and then on Merge Fields as shown below. This ensure that “Order ID” is used for the name of the merged field. We repeat that procedure for the other fields and we obtain a table where the names of the fields have been correctly converted.
This method is very simple. However, it can be quite tedious to merge many fields by hand. The two following methods propose an alternative solving this issue.
2) Merge fields with calculations
Here we propose a method where names from one convention can be easily transformed to another convention using calculations, for instance:
- In our example, the prefix of the names of data_1.xls “OR”, “SH” and “CS” are can be converted to “Order “, “Ship “ and “Customer” using the REPLACE function with IF and ELSE statements. The ending “DT” can be converted to “Date”.
- Imagine a data source with field’s names like “A – a1, A – a2, B – b1, B - b2” and in another convention fields are named as “a1, a2, b1, b2”. Here the conversion between the two conventions can be performed using the SPLIT function on the names of the first conventions.
The principle of the method is to apply a pivot transformation from columns to rows on the data, convert the names, and pivot again from rows to columns.
- First in a cleaning step, we will create a field that has a unique value for each row (it might already exists in the data), using the function ROW_NUMBER.
Put the ROW_NUMBER function between curly braces with an ORDERBY statement, here we choose “Customer ID” arbitrarily. The picture below shows the result:
- Now let us create a pivot, column to rows, step where you need to drag and drop all the fields, except “Row number”, as shown in the picture below.
- We rename “Pivot1 Names” to “Field” and “Pivot1 Values” to “Values”.
This is the pivoted table obtained after this step:
- We add a new cleaning step, where we will convert the names. For our particular example, we will create two calculated fields shown in the picture below. The first one will convert the prefixes and the second the keys of the names used in data_1.xls.
Our new calculated field “Fields converted” now contains only names of the second naming convention. We should now keep only the fields “Row number”, “Fields converted” and “Values”.
- We now add a final pivot rows to columns step. We drag “Fields converted” to pivoted fields, and drag “Values” to field to aggregate using the MIN or MAX aggregate function.
This produces the desired output.
3) Merge fields with a dictionary
This method proposes a way to merge fields when you cannot convert names from one convention to another with very few calculated fields. It uses instead a dictionary mapping the names of convention to another one. We created the dictionary in an excel file:
It is a generalization of the second method and uses the same initial and final steps in the flow.
- Starting from the pivot, columns to rows, step of the previous method, we create two cleaning steps as placeholders and we input the dictionary as shown below.
- We then do a right-join of the placeholder 1 column “Fields” with the dictionary column “Fields 1”, and another right-join of the placeholder column “Fields” with the dictionary column “Fields 2”.
The results of each join step are shown on the pictures below:
The field “Fields 1” is removed from each join step, as it will not be used afterward.
- We can now bring back Join 1 and Join 2 together using an inner join on the “Fields” and “Row number” columns. The two fields are needed in the join clause in order to have a one to one relationship.
- In a new cleaning step, we remove the duplicated columns for “Fields”, “Row number” and “Values”. We however keep the duplicated columns for “Fields 2”. The picture below shows the table we currently have.
In the same step, we create a calculated field that will assign the names as shown below.
- Now we keep only the columns “Names”, “Values” and “Row number” and add a pivot columns to rows step exactly like the last step in the second method.
Final words
Let us rename the file “_data_2.xls” to “data_2.xls” and refresh the flow. What we obtain at the output of each of the method described before is the table below. Fields of the two data files are correctly merged using the convention of “data_2.xls”, proving that this method also works when using two data sources with two different naming conventions.
With this simple solution, you can seamlessly deal with situations where you have different naming schemes in your data source and do not have to worry which one is used. The examples use with two naming conventions but this solution works with more.